
Workflow Examples
The project includes a ready-to-use example workflow with two independent Webhook endpoints — one for generating random passcodes and one for sending custom passcodes. Each endpoint includes email notification.
Download example workflow: workflow-webhook-ttlock.json
What the Workflow Does
Both endpoints share the same structure:
Receive Request → Call TTLock Node → Check Result → Email Notification → Return Response| Endpoint | Path |
|---|---|
| Random Passcode | Your URL + /randomPasscode |
| Custom Passcode | Your URL + /customPasscode |
Tip
Both endpoints share the same TTLock credential — activate once to use both.
Quick Import
- Open n8n and go to the workflow list
- Click "..." in the top-right corner → Import from File
- Select the downloaded
workflow-webhook-ttlock.jsonfile (click the button above to download) - After import, two complete sets of workflow nodes will appear on the canvas
Post-import Configuration
The workflow has 3 credentials that need to be replaced with your own:
| Credential | Purpose | Setup Guide |
|---|---|---|
| TTLock account | Call the TTLock node | See Configure Credentials |
| SMTP account (Email-Success node) | Send success notification emails | See Configure Email (NetEase Example) or Gmail Configuration below |
| SMTP account 2 (Email-Failure node) | Send failure notification emails | Same as above |
Configure Email (NetEase Example)
The example workflow sends email notifications on passcode generation success/failure. You need to configure SMTP email credentials first. Below is an example using NetEase 163 Mail.
Step 1: Enable SMTP Service
- Log in to NetEase Mail
- Go to Settings → POP3/SMTP/IMAP
- Enable IMAP/SMTP service
- Click Enable, a security prompt will appear, click Continue enabling
- An authorization code will be displayed — copy it (you'll need it later), enter a name, and confirm
Note
The authorization code is NOT your email login password. It's the random string obtained when enabling SMTP. Keep it safe.
Step 2: Create SMTP Credential in n8n
- Open the n8n email node → Parameters → Credentials → Add Credential
- Fill in the following information:
| Field | Value | Description |
|---|---|---|
| User | your-email@163.com | NetEase email address |
| Password | your-auth-code | Authorization code from SMTP setup |
| Host | smtp.163.com | NetEase SMTP server address |
| Port | 465 | SSL port |
| SSL/TLS | true | Enable encrypted connection |
- Click Save
Step 3: Use Credentials in Email Nodes
In the Email-Success or Email-Failure node of the example workflow:
- Expand the Credential dropdown
- Select the SMTP credential you just created
- Change From Email to your NetEase email address
- Change To Email to the notification recipient address
Configure Email (Gmail Example)
Below is an example using Google Gmail with App Password + SMTP.
Part 1: Prepare on Google Side
1. Enable 2-Step Verification (2FA)
This is a prerequisite — you cannot generate an App Password without it:
- Open https://myaccount.google.com/security
- Find Sign in to Google → Click 2-Step Verification
- Follow the prompts to enable it (Google Authenticator / SMS text / backup codes)
Note
You cannot generate an App Password without 2FA enabled. This is a hard requirement.
2. Generate an App Password
- Open https://myaccount.google.com/apppasswords
- If you see "No options found", you haven't enabled 2FA yet — complete the step above first
- Fill in:
- Select app: Mail or Other (custom name)
- Name: Enter
n8n(for easy identification)
- Click Create
- A 16-character password will be displayed, formatted like
abcd efgh ijkl mnop
Note
Copy and save it immediately! You won't be able to view it again after closing this page. Remove the spaces when entering it in n8n, i.e., use abcdefghijklmnop.
3. Confirm IMAP is Enabled
- Open Gmail Settings → Forwarding and POP/IMAP (https://mail.google.com/mail/u/0/#settings/fwdandpop)
- Find IMAP access → Select Enable IMAP
- Scroll down and click Save Changes
Part 2: Create SMTP Credential in n8n
- Open the n8n email node → Parameters → Credentials → Add Credential
- Fill in the following information:
| Field | Value | Description |
|---|---|---|
| User | your@gmail.com | Your Gmail address |
| Password | your-app-password | The 16-character App Password from above |
| Host | smtp.gmail.com | Gmail SMTP server address |
| Port | 465 | SSL port |
| SSL/TLS | true | Enable encrypted connection |
- Click Save
Part 3: Use Credentials in Email Nodes
In the Email-Success or Email-Failure node of the example workflow:
- Expand the Credential dropdown
- Select the SMTP credential you just created
- Change From Email to your Gmail address
- Change To Email to the notification recipient address
Modify Email Addresses
The imported example uses placeholder email addresses — change them to your own:
- Email-Success / Email-Success-Custom nodes: modify
From EmailandTo Email - Email-Failure / Email-Failure-Custom nodes: modify
From EmailandTo Email
Request Parameters
Tip
clientId, accessToken, and date are handled automatically by the node — no need to include these fields. See Configure Credentials.
Both endpoints share base parameters. The custom passcode endpoint additionally requires keyboardPwd and addType.
Common Parameters (Both Endpoints)
| Field | Type | Required | Description |
|---|---|---|---|
lockId | string | Yes | Smart lock ID, available via Get User Lock List API |
keyboardPwdType (displayed as Passcode Type) | number | No | Passcode type, default 3 (Period) |
keyboardPwdName (displayed as Passcode Name) | string | No | Passcode name |
startDate | string | Yes | Passcode effective time |
endDate | string | No | Passcode expiry time |
Additional Parameters for Custom Passcode Endpoint
| Field | Type | Required | Description |
|---|---|---|---|
keyboardPwd (displayed as Passcode) | string | Yes | Passcode content to transmit, e.g., 5809371 |
addType (displayed as Add Method) | number | No | Add method, default 1 (Bluetooth). See docs for details |
For full parameter details: TTLock Open Platform Docs - Create Random Passcode / Add Custom Passcode
Usage Examples
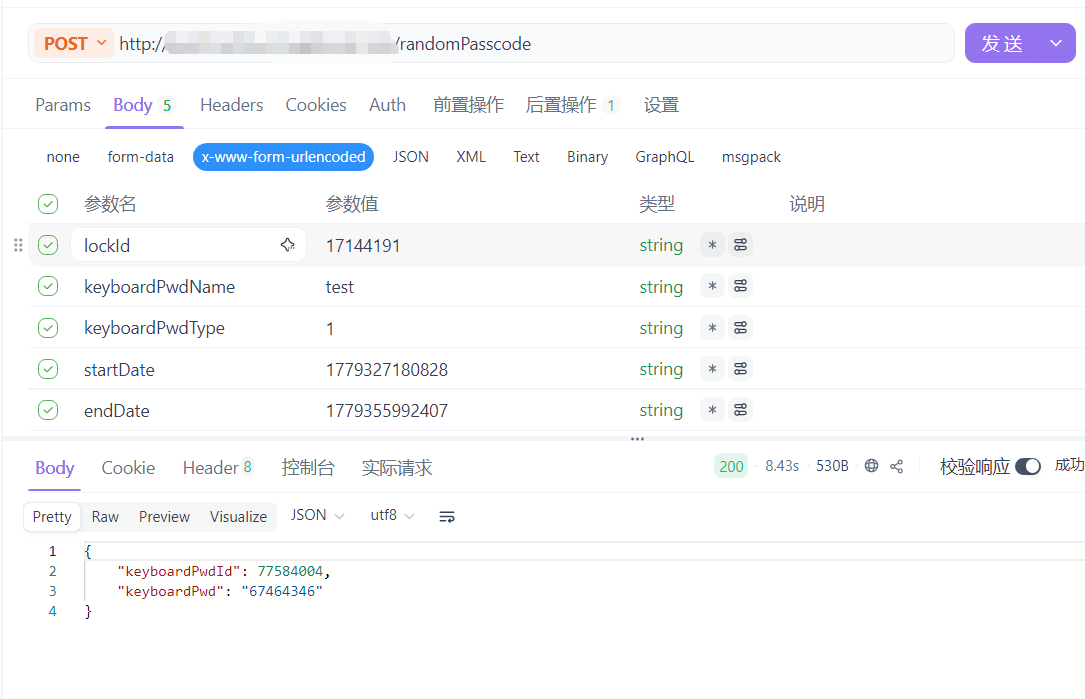
Create Random Passcode
curl -X POST http://your-n8n-url/randomPasscode \
  -H "Content-Type: application/json" \
  -d '{
    "lockId": "your-lock-id",
    "keyboardPwdType": 3,
    "keyboardPwdName": "Guest Passcode",
    "startDate": "2026-05-07 09:00:00",
    "endDate": "2026-05-07 18:00:00"
  }'
Create Custom Passcode
curl -X POST http://your-n8n-url/customPasscode \
  -H "Content-Type: application/json" \
  -d '{
    "lockId": "your-lock-id",
    "keyboardPwd": "5809371",
    "keyboardPwdType": 3,
    "keyboardPwdName": "Custom Passcode",
    "startDate": "2026-05-07 09:00:00",
    "endDate": "2026-05-07 18:00:00",
    "addType": 1
  }'
Response
Random Passcode
{
  "keyboardPwd": "73691670",
  "keyboardPwdId": 7906873
}
Custom Passcode
{
  "keyboardPwdId": 7906873
}
Node Description
Both endpoint sets have identical node structures — only names and configurations differ:
| Node | Type | Role |
|---|---|---|
| Webhook / Webhook-Custom | n8n built-in | Receive POST requests using Respond to Webhook mode |
| TTLock / TTLock-Custom | TTLock Node | Extract params from request body, call corresponding API, Continue On Fail enabled |
| Check Result / Check Result-Custom | n8n built-in | Check if errcode is empty to distinguish success/failure branches |
| Email-Success / Email-Success-Custom | n8n built-in | Send HTML email with passcode on success (blue theme for random, green theme for custom) |
| Email-Failure / Email-Failure-Custom | n8n built-in | Send HTML email with error info on failure (red theme) |
| Respond / Respond-Custom | n8n built-in | Return TTLock raw response as JSON |
Customization
You can edit the imported workflow directly on the n8n canvas:
- Webhook path: Modify the
Pathfield in the corresponding Webhook node - Default passcode type: Change the expression in the corresponding TTLock node's
keyboardPwdTypefield - Email templates: Edit styles and content in the corresponding email node's
HTMLfield - Skip email: If you don't need email notifications, delete the email nodes directly and connect the IF node output to the Respond node